Showing posts with label hardscape. Show all posts

26 May 2014

New Screen to Cover the Compost Zone


John got the gumption recently to build a screen to block one of our back utility areas, and I couldn't be happier.


Though it's way in the back corner of our back garden, the compost bins have always driven us nuts, and the back chainlink fences that we share with neighbors are forlorn. The screen is a good way to create a visual block without having to spend a bunch of money and time on a complete fence.

Plus, it creates a "behind the scenes" space where we can toss compost, tree limbs and etc while we figure out what to do with them all.

Here are a few process photos:


For anyone interested in implementing something similar, we used 4x4 rough cedar posts and 2x2 rough cedar for the slats. We decided not to cement this in, because it's not a weight bearing structure, and we might have to remove it someday if we do any other bigger projects out back.

It should hold up just fine for a number of years.

02 January 2014

Path and Rock Garden Inspiration


This natural outcropping at Enchanted Rock State Natural Area is a great inspiration for a stone walkway scattered with plants.

Imagine large flat chunks of irregular stone planted with little bluestem, moss and a few perennials and you've got it. Full Texas sun and all.


In fact, head over to Rock Rose and you'll see what one beautiful interpretation of this looks like.

12 February 2012

Let There Be Light


Lights! We have lights.

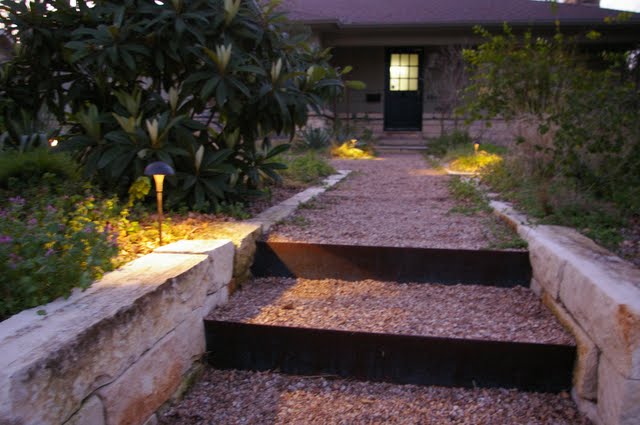
Just installed some new low voltage landscape lighting this past weekend to ease our way through the front yard. Frankly, it's actually pretty bright on many nights here in the city, particularly when there are clouds reflecting all the city lights. But still, our front stairs can be treacherous in the dark, and it was a safety imperative. We don't want our East Side Pies pizza delivery folks to hurt themselves, now do we? That pizza belongs in my belly, not strewn across the pea gravel.

The set up
We opted for 3 simple lights along the main path; one to light the stairs and two others to light the corners.


We also buried an up-light to shine on our custom steel house numbers on the limestone wall. It was way too bright with a 20 watt bulb, so we hunted down a lower wattage 10W halogen at the Light Bulb Shop up on Burnet. (We don't need planes landing in our front yard...just a little visibility.)


John also rigged up this old Japanese lantern that we purchased long ago at a Wimberley Market Day with a landscape light that he took apart and re-purposed. It's still a little bright, in my opinion, but we'll work on that.


Why didn't I use solar?
For several years, we tried to use solar lights to light the paths. It seemed like the right thing to do, but they consumed battery power fast and never really stayed charged in our shady yard. My brother - who owns a successful solar installation business in Seattle called A&R Solar (if you're in those parts) - and I talked at length about whether solar lights were more or less eco-friendly than hardwired low voltage lights. Though our power mix in Austin is largely coal, which is dirty, he said that the hardwired, low-voltage, longer-lasting lights were probably the best way to go in this case. They don't use much power, and batteries and throw-away solar lights might not be as eco-friendly as we think.

What about wildlife?
Garden lighting can also be very bad for wildlife, and I am really conscious of that. Artificial lights throw animals off their life and mating cycles. I love moths, and everyone knows how they are drawn to their deaths by lights. But it effects frogs, night mammals, owls, sleeping birds, and even plants. Here's a neat presentation on that by Travis Longcore with LA's Urban Wildlands Group.

So, we opted for as few lights as we thought we could (no glamorous uplit trees for me, thank you) and wired them up so that we can turn them off and on with a switch. The idea is that we will only turn them on when we need them - like when we know people are coming over - not daily. We'll see. It's always a balance.

23 October 2011

Further Defining the Back with Patio Work Surface


We used to have a nice rectangle of grass in the way back, about 14 x 20 feet. It was the last patch of lawn in our entire yard, and we rather liked it conceptually. But, the drought has taken care of that.

So, we've evolved our thinking of the space too. John has been quite diligently piecing together patio limestone to create both a nice walking surface beneath our laundry line and a visual delineation between the well-defined pea gravel veggie beds and what will become the wilder area in the back corner of the yard. It's design is very gyo, with so materials and a rectangular shin shape.


What remains of the old lawn is now a dirt square that we'll fill in with stuff. We've decided to basically give that over to the wild, letting things seed themselves and planting new plants that will benefit the wildlife. We have plenty of space for ourselves, so this area and one other are going to become more completely natural.

Lest it looks like it's all for show, here's what the new limestone workspace looks like in service, towels on the line...


25 September 2011

Gyo Wall


I stumbled across this absolutely gorgeous limestone wall in the Brentwood neighborhood today. It screams "gyo," where controlled stones are mixed with natural stones to create a wall that seems highly precise, yet organic. The combination of sawn limestone with natural aquifer karst and other patio limestone is just incredible. Very well done. Actually, this whole garden was nice, but I hated to lurk to long in front of it with my iPhone out snapping photos...I'm such a garden stalker...

18 September 2011

New Stone Garden Beds

Back in July, I posted about how our wooden raised veggie beds were rotting and falling apart. Last night, John poetically referred to them as large sinking battleships, falling into a sea of pea gravel. They've certainly provided us with a lot of food over the last few years, so a silent salute...

Any good Southerner will know the answer to the following question: what happens when you have untreated wood in contact with soil, especially moist soil?

Yep, you guessed it: termites.

The wooden raised beds are home to happy colonies of the farkers. Hopefully, they don't make their way to the casa itself. Yikes.

The first step in making new lower beds was removing the dirt from one of them and replacing it with new limestone (6in Blanco Chop in this case). That one then became the planting ground for the herbs growing in the second bed.

This photo shows the first completed one with its new plants. The second wooden bed has been dismantled in the back.

Here are the first two completed and mulched with pine straw.


The new beds are smaller, further apart and lower. I just don't need that much space to grow veggies. Their lower profiles and stone will also prevent the heavy evaporation and drying that occurred with the wood (oh, and termites too!).

Next step will be to replace the really large wooden bed with two smaller 4' x 4' ones to match the others. It'll be a nice little grid. Very pleasing to my orderly sensibilities. And then I'll have to get the drip irrigation all hooked up again.

Here's a beautiful okra flower and okra fruit from the plants growing now in the larger bed. They love the heat.


Here is my attempt to keep the spearmint in check, planting it in metal buckets buried in the ground.

Hopefully, that will prevent runners from taking over. But if they do, so be it. I love mint.

13 August 2011

Quick Retaining Wall


I threw together this quick and dirty limestone wall today, since it was cool and cloudy out (yep, 98 degrees feels cool). We had some limestone left over from our big front wall project, and this berm in the back needed something to anchor it.

The goal is to get more level soil around the mountain laurel and loquat so that those two retain a bit of water when it does ever come. Otherwise, the water just runs off the berm. Plus, it gives me new planting possibilities.


It's definitely not high design. Very wabi-sabi. Just reuse of materials we already have and hopefully something useful too. It'll be fun to plant little things in front of the wall and perhaps some behind it that drape over the top.

02 June 2011

Back Gate and Pergola: And Done

And...complete. The back gate and pergola project has come (basically) to an end, with only minimal cursing and mis-measurements (oops). I really love working on these projects with my partner in crime, John. It's truly a pleasure to work along side someone on a project like this. To share happiness and frustration, to analyze the technical issues that arise, and to see it to completion. Happy go lucky, yo.

Hello sweet shade and beautiful shadows!


This pergola completely transforms our back pathway area into a full-on space. It's shady and cooler and the trickling sound of the new fountain just beckons me in every time I arrive home.


It's a great way to enter the backyard, and so very nice to be able to not have the hot afternoon sun blasting down on us and the house.


There are certainly temptations to grow vines on this baby, or put in chairs and a bistro table, or hang hammocks. But we are going to try our damdest to resist some of that in order to keep the space simple.

Complete non sequitur: the new Death Cab for Cutie album is just.really.good. "We are all the same, underneath the sycamores." Indeed.

Just a reminder to self: here is the before and after shot.


There were some fears expressed before we started - would it be too shady? and etc. - but they were completely unfounded. It worked out just great...whoo hoo!

01 June 2011

Back Gate: Building Process


This is how Bodi watches us work. He's a damned ranch dog at heart.

31 May 2011

Back Gate: The Gate Installed

We're marching forward like the little ants that we are, building and building on the back gate and pergola project.

The swinging gate has been installed.

And already making fantastic patterns of shadow and light on the wall and limestone path.


Mr. Ed is hanging his head over the gate. Perfect height...Is he tired or just greeting the neighbor? I vote for tired. Real frickin' tired...

23 May 2011

Back Gate: Slats


Whew. We made it this far this weekend on the back entry gate project. After finishing the initial frame, we installed the slats on the frame, requiring much measuring, precision, and leveling. Breath in, breath out...


For this entire project, like all of the other fencing in the garden, we've chosen "rough" cedar. Cedar is naturally resistant to most pests, including termites, and looks lovely fresh and full of color and aged and gray. That process of hand-making things and loving them as they age is very wabi-sabi, wouldn't you agree Ms. Holt? I love the cedar in its young fresh reds and oranges, but equally enjoy the mellowness of its aging grays. 

The posts are simple and easy to obtain 4x4s, the header is a slightly larger 4x6 and the slats are 1x4s. 

Next steps will be to finish the gate, and then on to the pergola. I can't wait!

21 May 2011

Back Gate Part Uno

Today was the first day of the new Back Gate and Pergola project. We had the requisite visit to Lowe's...


...and then demolition of the old gate.


We got as far as the new support beams today, and the shape is starting to take, well, shape.


Here's our over-engineering of the top support, which is really never a bad idea.


And the whole fiasco was being watched over by our burgeoning Texas Spotted Whiptail and Fence lizard population.

Bet those lizards wish they were drinking a gin and tonic right now. Yum. Unfortunately, this project necessitated the missing of what was sure to be a fabulous A-Go-Go event with some local garden masters and mavens, and some fancy-dancy tour of outside gardens in Austin that looked to feature lots of pools and waterfalls and expensive things in the suburbs.... (Oh but it would've been cool!)...