

28 February 2011
All Lit Up


Wow, it is really difficult to capture the new patio posts in the evening with the lights aglow. This'll just have to do it. If you are wondering about the process, here's how we did it. I couldn't be more pleased. The feeling is in some ways similar to when the lights were hung randomly across the middle of the patio in a V shape, but slightly more linear and enclosed feeling. Perfect.
20 February 2011
garden: Making a Patio into an Outdoor Room
For Christmas, my brother gave me a set of really cool industrial outdoor lights for the back patio. I love them. But then, I noticed they were slowly getting lower and lower. And I noticed why one evening: they were pulling down the slender fence post I had attached them to and the fence was getting all wanky-jawed. Combined with wind and freezing temperatures, the night I discovered this was a night I didn't get much sleep. With every gust, I awoke imagining all the lights smashing against the ground.
So, I reluctantly pulled the lights down the next day. It was them or the fence.
But, what it meant was that I could put into play a design idea I'd had since creating the back patio: installing four large posts in each corner and stringing lights around them in a square shape. Possibly even growing vines on the posts.
What this would do, I figured, was enclose the space just enough to make it feel like a room. But without a ceiling and traditional pergola, it would still feel open to the night and day skies and allow for fire pits and outdoor movie nights.
John, thankfully, was game.
This is what the patio looked like with the lights just removed and before we installed the posts.


Here's our post installation process.
We opted for 6 in x 6 in x 10 ft cedar posts, which are not common. In fact, we had to special order them from McCoy's (and I can't say enough about how nice they are there.) I wanted them to be tall enough after being sunk 2 feet into the ground that my tall self could pass beneath them without ducking. Four-inch cedar posts are more common. But I figured - like the fence before them - they would begin to buckle from the weight and start to bow. The 6 x 6 posts would be substantial with no risk of bending.
We began by digging the post holes, filling the holes with about 2 inches of gravel and then placing the posts in the holes.

Once the posts were centered and leveled, we supported them in place with easily removable 2x4s.
Once all of that ground work was laid, we got started with the concrete. Turns out that the holes, at 28 inches deep and about 12 inches in diameter, required A LOT OF QUIKRETE to fill. Oh my. Each post required about four 80 pound bags of concrete, meaning that each post is supported by about 320 lbs of concrete. Ridiculous!


John had the brilliant idea to finish the top of the concrete with a nice square. This would help water run off from the post which prevents rotting, but also added a nice finishing touch. So, he built small frames that we stuffed with the concrete.


After curing for about 24 hours, we removed the frames.

And then removed the supports and moved all the pea gravel back into place.
 And voila!, we have four big honkin' posts defining our patio space.


Indeed, it already gives the patio a slightly more enclosed feeling without being overbearing. The posts clearly define the edges of this social space.
Next steps after the posts cure for a bit will be to add the lights. That will be the finishing touch, and will really bring the complete space into being. Even more exciting: these posts are hammock ready. We've been searching for hammock hanging space for years, and now we've got it!
So, I reluctantly pulled the lights down the next day. It was them or the fence.
But, what it meant was that I could put into play a design idea I'd had since creating the back patio: installing four large posts in each corner and stringing lights around them in a square shape. Possibly even growing vines on the posts.
What this would do, I figured, was enclose the space just enough to make it feel like a room. But without a ceiling and traditional pergola, it would still feel open to the night and day skies and allow for fire pits and outdoor movie nights.
John, thankfully, was game.
This is what the patio looked like with the lights just removed and before we installed the posts.


Here's our post installation process.
We opted for 6 in x 6 in x 10 ft cedar posts, which are not common. In fact, we had to special order them from McCoy's (and I can't say enough about how nice they are there.) I wanted them to be tall enough after being sunk 2 feet into the ground that my tall self could pass beneath them without ducking. Four-inch cedar posts are more common. But I figured - like the fence before them - they would begin to buckle from the weight and start to bow. The 6 x 6 posts would be substantial with no risk of bending.
We began by digging the post holes, filling the holes with about 2 inches of gravel and then placing the posts in the holes.

Once the posts were centered and leveled, we supported them in place with easily removable 2x4s.
Once all of that ground work was laid, we got started with the concrete. Turns out that the holes, at 28 inches deep and about 12 inches in diameter, required A LOT OF QUIKRETE to fill. Oh my. Each post required about four 80 pound bags of concrete, meaning that each post is supported by about 320 lbs of concrete. Ridiculous!


John had the brilliant idea to finish the top of the concrete with a nice square. This would help water run off from the post which prevents rotting, but also added a nice finishing touch. So, he built small frames that we stuffed with the concrete.


After curing for about 24 hours, we removed the frames.

And then removed the supports and moved all the pea gravel back into place.


Indeed, it already gives the patio a slightly more enclosed feeling without being overbearing. The posts clearly define the edges of this social space.
Next steps after the posts cure for a bit will be to add the lights. That will be the finishing touch, and will really bring the complete space into being. Even more exciting: these posts are hammock ready. We've been searching for hammock hanging space for years, and now we've got it!
14 February 2011
critters: From the South Carolina Sea

When in South Carolina over the holidays, we took some great beach walks and I collected a bunch of critters. I'm like my mom and aunt in that way. Put me on a beach and I can't help it; I leave with pockets full of shells and bags of random stuff, like sharks teeth, sea urchin tests and whelks. It's kind of an addiction. (My mom, in fact, recently started cataloging her shelling adventures on her own blog, Tidelines.)
Anyway, I collected the finger sponges, starfish and horseshoe crab you see above. Thankfully, John let me stow these stinky creatures in the trunk for the ride home. Since then, they've been drying a getting slightly less stinky outside, where they will probably remain.
Inspired this weekend, I created an ocean scene in one of my cement planters.


This trio is made of two sponges and a ceramic sculpture by an artist from Madison (sorry, can't remember her name as it was many years ago now). I was drawn to buy the piece because it reminded me of a sea sponge or some other living critter from the depths of the ocean. I think it goes perfect with the real thing!
13 February 2011
cold: Assessing the Damage
Strolled around the garden this weekend assessing the damage from the Great Cold of 2011 (it better be done, by the way, because this weekend was amazing). Most things at the Grackle actually fared pretty well, but there are some things that are freeze dried and mushy. Mostly the zone pushers and non-natives. Here they are:

These pretty little yellow and green agaves are toast.
 Barbados cherry, as last year after the frost. Crispy and freeze dried.

The lavender is not looking so hot either.

Anacua, or sandpaper tree, with brown sandpapery leaves. If it doesn't freeze, this is an evergreen. This year, as with last, it is freeze dried.

The bamboo muhly - so green just a week ago - is yellow and toasty. It's still pretty though, catching the sunlight.

These pretty little yellow and green agaves are toast.


The lavender is not looking so hot either.

Anacua, or sandpaper tree, with brown sandpapery leaves. If it doesn't freeze, this is an evergreen. This year, as with last, it is freeze dried.

The bamboo muhly - so green just a week ago - is yellow and toasty. It's still pretty though, catching the sunlight.
10 February 2011
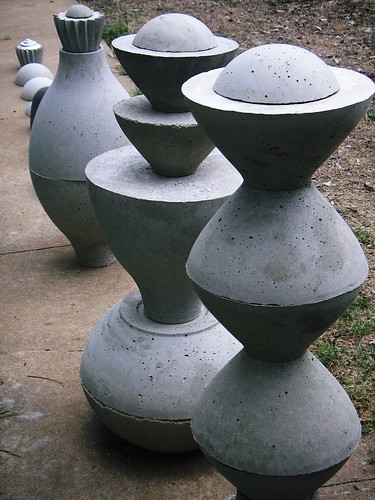
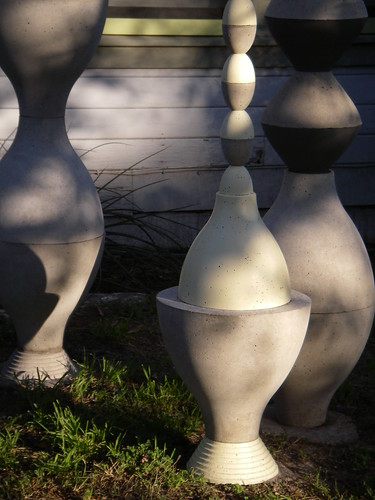
inspiration: Cement Sculpture at PCO Designs
 I've begun to dabble a bit in concrete construction, building a couple of bird baths and planters. And I can't wait for it to get a bit warmer so I can begin experimenting again.
That said, I am a total amateur compared to Paul C. Oglesby, Jr. over at PCO Designs. That's his work to the left. It's all very space-age and has a slight biological feel to it. Head over to his site and check it out.
Amazing!
(Hat tip: Stephanie Nance.)
Label:
art,
insipiration,
inspiration,
The Outside World

04 February 2011


02 February 2011
cold: F**k This S**t
Apologies go out to any sensitive readers out there, but I guess this blog isn't really for the 18 and under crowd. So, I just have to say that this cold weather f**k'n sucks! Me and my plants, we didn't move into this yard to have to deal with two years in a row of below 20 degree weather. This is not the norm for Austin. Poor me. Poor plants.
These crazy cold snaps are really stressful for me as a gardener, and my thoughts go out to all those farmers around Centex that are trying to make a living out there. This cold sucks! (Oh wait, I already said that.)
I definitely push the zone a bit with my plants, and of course, those are feeling the burn right now. Dark green frozen cells that will turn to slime on Saturday when things warm up. The zone-pushers like anacua (sandpaper tree) and Barbados cherry are going to be really unhappy with this situation. I can hear them screaming out there as I type...
But even my zone appropriate natives are used to this crap. The pale leaf yuccas are all curled up like hand-rolled cigarettes, the columbine is dying back, prickly pears and turning white as ghosts, and etcetera. Damn it.
Whaaa. Ok. Done with that.
Label:
commentary,
weather
Subscribe to:
Posts (Atom)